CHANGING GRINDER BURRS, WHEN AND HOW
If you can't remember the last time you changed your espresso grinder burrs, chances are they could be dull. In fact, your burrs are slowly dulling each and every time you use your espresso grinder. This goes for all your bulk grinders too, though their burrs tend to last significantly longer.
HOW TO CHANGE GRINDER BURRS
Remember to ALWAYS use caution and ALWAYS UNPLUG YOUR GRINDER before starting to work on it.
Tools Required: Two screwdrivers and possibly an adjustable (Crescent) wrench
1. Empty the beans and run a dose of Grindz through the machine to make cleanup that much easier once you get inside. Remove the bean hopper.
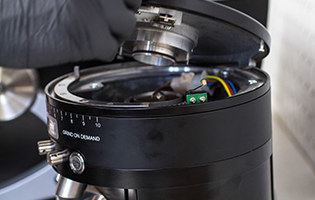
2. UNPLUG GRINDER. Push down grind adjustment lock and unscrew upper burr carrier all the way. The direction will vary depending on the brand of grinder you are working on. Some grinders do not have an adjustment lock and simply use tension springs and a fixing screw to hold the grind adjustment collar.

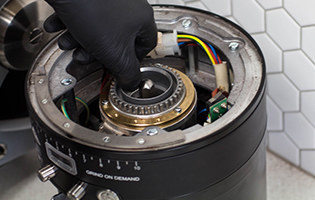
3. There will be one burr on the bottom of the burr carrier you just removed and one inside the grinding chamber attached to the motor shaft. (Each burr is held in place with two or three screws). Using a screwdriver, remove the screws from the burr that is attached to the upper burr carrier and remove the old burr – this is the easy one.
4. Removing the lower burr is a bit more complicated, as it is attached to the motor shaft and will want to spin. Using an additional screwdriver (or adjustable wrench on the fixing bolt), hold the lower burr carrier in place while releasing the burr attachment screws. Be careful not to damage the surface of the grind chamber by sticking a screwdriver through the chute or wedging something on one of the fins.

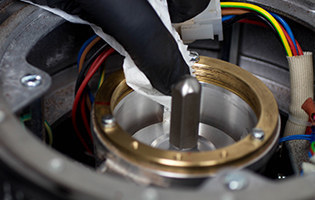
5. Make sure that you remove any and all coffee residue from the mounting surfaces of the burrs. Also clean all the adjustment threads on the upper burr carrier prior to installation. Now is the time to do a thorough cleaning of the entire burr area.
Pro Tip: If you are using a vacuum, be sure all small parts and springs are removed first, and wait to empty your vacuum until reassembly is complete.
6. After everything is thoroughly cleaned, install the new set of burrs. Do not completely tighten down each screw at one time, make sure to alternate. Tighten each screw a little at a time until all screws are tightened evenly. This will ensure the burr is tightened down equally all the way around to prevent any unevenness.

7. Replace the upper burr carrier by screwing it back in. You should put just enough lube on the clean threads of your upper burr carrier to make the threads shiny. No more. You do not want to have any excess lube contaminate the grind chamber.
CAUTION: It is extremely important that you use caution when reinstalling this part. Do not force the carrier into place, as you will damage the adjustment threads (an expensive mistake). If you place the carrier into position then thread it backward, you should feel the collar drop into place and it should screw in much easier.
8. Once you have the collar in place and have screwed it in by a few turns, then you can plug the grinder back in. With the bean hopper off and the power on, screw the collar all the way down until you hear the burrs barely touching then turn back one-half turn. From this point, you can begin to “fine tune" your grind. For more info on dialing in your grind, check out our tutorial on adjusting your grinder. If you find that the grind is inconsistent or too coarse no matter how fine you go, the upper carrier is likely misaligned or cross threaded. Repeating step 7 and ensuring that the threads and carrier are straight should help correct the problem.
When do I change my Grinder Burrs?
The easy answer is to change your burrs using the grinder burr manufacturer's recommendations. However, for the coffee professional, the manufacturer's recommended replacement standards may take the burrs far past personal threshold of quality. The extreme perspective might call for one to change their burrs at the half-life. So your 880 lbs becomes 440 lbs and so on. We suggest to our customers that you be aware of the condition of your burrs. If you are quality oriented and find yourself particularly sensitive to the negative effects dull burrs can have on espresso flavor or consistency, Espresso Parts recommends to start looking for signs of wear beginning from 50%-75% of the recommended burr life. It's a fine line. As long as things are looking and tasting great, you are probably good to go.
MANUFACTURERS BURR LIFESPAN RECOMMENDATION:
Anfim Caimano (75mm flat burr) – change at 1,300lbs throughput.
Bunn G Series - change at 40,000lbs throughput.
Fiorenzato AllGround - change at 1,300lbs coffee throughput.
Fiorenzato F64 EVO PRO - change at 1,300lbs coffee throughput.
Fiorenzato F64 EVO XGi PRO - change at 1,300lbs coffee throughput.
Fiorenzato F83 E PRO - change at 2,000lbs coffee throughput.
Fiorenzato F83 E XGi PRO - change at 2,000lbs coffee throughput.
La Marzocco Swift (64mm ceramic flat burr) - change at 3,300lbs coffee throughput.
Mahlkönig E80 Supreme - change at 3,300lbs coffee throughput.
Mahlkönig E80 Supreme GBW - change at 3,300lbs coffee throughput.
Mahlkönig E65S - change at 1,600lbs coffee throughput.
Mahlkönig E65S GBW - change at 1,600lbs coffee throughput.
Mahlkönig EK43 – change at 14,300lbs coffee throughput.
Mahlkönig Guatemala - change at 6,600lbs coffee throughput.
Mahlkönig K30 – change at 1600lbs coffee throughput.
Mazzer Mini (58mm flat burr) – change at 660lbs coffee throughput.
Mazzer Mini E - (64mm flat burr) - change at 660lbs of coffee throughput.
Mazzer Super Jolly (64mm flat burr) – change at 880lbs coffee throughput.
Mazzer Major (83mm flat burr) – change at 1,300lbs coffee throughput.
Mazzer Kony (63mm conical burr) – change at 1,640lbs coffee throughput.
Mazzer Robur 110V (71mm conical burr) – change at 1,700lbs coffee throughput.
Mazzer Robur 220V Three Phase (83mm conical burr) – change at 1,800lbs coffee throughput.
Nouva Simonelli MDX (64mm flat burr) - change at 1,200lbs coffee throughput.
Nouva Simonelli Mythos (75mm flat titanium burr) - change at 1,500lbs coffee throughput.
EXPERT TIPS
HOW TO PROLONG THE LIFESPAN OF YOUR GRINDER BURRS
To prolong the life of your burrs, keep them clean. We find that Urnex Grindz does a terrific job of cleaning the burrs and removing lodged solids and oils. Removing, thoroughly cleaning, and re-installing grinder burrs regularly will also help extend their life.
HOW TO SEASON YOUR GRINDER BURRS
Some brand new burrs can require a breaking in or “seasoning" period before they achieve the consistency you might desire. It’s a good idea to save a few pounds of old coffee so that you have something other than fresh coffee. Uncooked rice can be a great alternative.
THE BEST COMMERCIAL COFFEE GRINDERS FOR COFFEE SHOPS
The best commercial espresso grinder doesn’t exist. They’re each as unique as your business and its requirements. So how’s a café owner supposed to know they’re picking the right espresso grinder without going overboard—and without missing out on key features? Learn what to look for and the benefits of flat burrs, conical burrs, stepped and stepless, doser and doserless and the best commercial espresso grinders in this article.


