
HOW TO INSTALL THE RINSER MAINTENANCE KIT
1. Turn the water off. This will ensure you stay dry and The Rinser piston assembly can be easily removed.

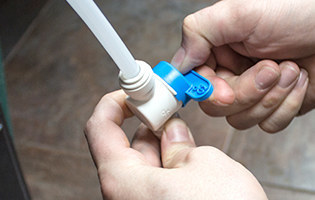
2. Depressurize the remaining water in the line by depressing the star until no water sprays out. You’re now ready to remove the piston assembly.
3. Remove the black star from The Rinser. You’ll spin it to the left, or anti-clockwise. If the spray head with the holes spins as well, you’ll need to press down to keep that from spinning while we’re removing the black star.
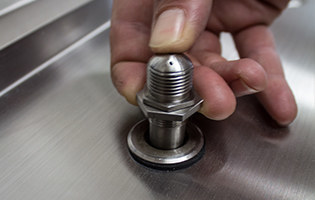
4. Now that the star is removed, you’ll see two hex bolts. The smaller one on the top will stay put, we’re going to remove the bottom hex bolt. You may need to use a 22mm wrench to remove it, but it most cases it’s just hand tight. It’s also removed by spinning it to the left, or anti-clockwise. When you’re done unscrewing the hex nut from the base, simply lift the piston assembly from the base of The Rinser.
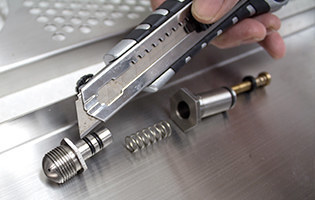
5. Next we need to separate the piston assembly. Depress the assembly and unscrew the brass screw at the base. Again, it should be able to be removed by hand, but you may need a flathead screwdriver. Careful now! That screw is out, but there still is a spring inside there. Release the pressure you’ve been applying to the assembly, and lift the spray head from the piston assembly base. Don’t drop the spring! Catch it in the palm of your hand.
6. Now you’re ready to rebuild the rinser with the Rinser Rebuild Kit.There are two o-rings that are the same size (PR_6) will go on the base of the spray head. Remove the old ones by carefully cutting them off, or using a dental pick to pry them off. The new ones should just slide over the stem and on. Next up is the oring on the base of the assembly (PR_5) You’ll remove and install the new one in the same fashion you replaced the last two o-rings. Finally you’ll replace the gasket (PR_4) on the brass screw.
7. Time to reassemble. Grab the base and install the screw up through the bottom. Drop the spring inside. You’ll now need to put a finger on the screw while you thread the spread head on. It installs by spinning it to the right, or clockwise. There’s really no need for a screwdriver here. Hand tight is tight enough. Now that your piston assembly is ready to be reinstalled.
8. Take your complete piston assembly and drop in back into The Rinser. Turn it to the right, or clockwise again until it stops. No need for a wrench here either. Next is the black star. Spin that on, again to the right, until it stops. Now turn your water back on. Check for leaks. Try out the rinser. You should get great spray now from your Rinser and be ready to rock!
TROUBLESHOOTING

The water is on and the line is not blocked but no water is coming out?
Overtime the holes on the Rinser Activation Piston can become clogged. Try taking a paper clip and clearing the holes or you can replace the activation piston. You can find it here.
Water is constantly spraying, how do I get it to stop?
The Rinser Activation Piston can wear and it will not allow the piston to close completely. First, take the spray assembly apart and reassemble to make sure the piston screw is in tight. If that doesn’t work we recommend replacing it. You can find it here.
I have to press the spray star over and over again to get water to come out?
The Rinser Activation Piston can wear out. First, take the spray assembly apart and reassemble to make sure the piston screw is in snug. If that doesn’t work we recommend replacing it. You can find it here.
I just got my rinser and it’s not working like I expected it would?
You may need a water pressure regulator. In some cases high water pressure will cause The Rinser to malfunction. Adding an inline pressure regulator will clear up those issues and have your Rinser running right in no time!


